Tuesday, August 20, 2013

Prayer and Support

This past week has been weird. And that's putting it lightly. I was super busy at work with this being the last weekend before school starts, while battling a cold. Friday my dear Puma got in a wreck and his car it out of commission for a while. And during all this we are praising God. Thank you, God, for keeping my fiancé safe in what could have been a fatal incident, and thank you for blessing me with the job I now have and the strength to handle the busy weekend even while sick. 

With that said.

Oh. My. Gravy. 53 days! Sewing isn't completed but it is coming along on schedule. The only iffy item being my Puma's jacket :-/

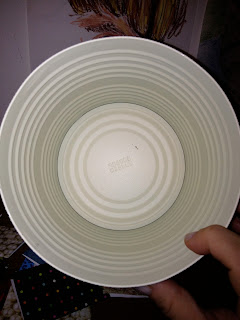
Finished another project today. I won't tell you what it is but I will give you an upclose view. Guess it right and I'll post the full pic!

My wonderful future mother-in-law sent out shower invites this week. I am so grateful and thankful that she organized a coed wedding shower for Puma and I. We are really looking forward to it. 

There's the current update. Back to chocolate gears and crafting. 

~Lion

Wednesday, August 14, 2013

Bragging Rights

So I wanted to spend this post bragging on my amazing fiancé and to set straight a few misconceptions about our wedding. 

My wonderful fiancé, "Puma," (aka Victor) has been my planning and DIY partner. We bounce ideas off of each other and spend a good portion of our together time accomplishing tasks for the wedding. He is working his tail off and putting in so much effort. He even dowloaded craft store apps to his phone so we can double our purchasing power. When I have to work on the weekend, he'll pass time at the apartment working on a project. Crafts sticks, painting, cutting, fabric cutting and burning, computer stuffs, etc. There are also the non-tangible things he does as well. Praying for us, praising, encouraging, loving. He is the one by my side. 

Before we became engaged, we decided that this was going to be our endeavor. No maid of honor. No best man. We do  have groomsmen and bridesmaids, but no one assigned the responsibility of helping us. We wanted to do this: the trial, error, success, disagreements, fights, negotiations, compromise, solutions. All us. We figured it would be a good way to skip over that fluffy barrier the hides potential fights and disputes until after the wedding. We know marriage isn't easy. It's not some magical happy ending. It is work. Hard work. We want every opportunity to figure out how to work together. We are going to be partners for the rest of our lives. This skill is kind of important. 

Unfortunately, he has not been given enough credit. Tiger (aka D) has been my crafting buddy and roommate the past couple of years. People have assumed she's my maid of honor and the crafting co-conspirator for this. I love her dearly and this is not meant to offend- but she isn't. It hurts me everytime I hear about someone seeking her out for answers to the wedding. She has a general idea, but the details are not all known to her. Steampunk is not a genre well known to her either. Let me repeat: I love her dearly. But the concepts and ideas I get from her are not exactly where we are heading. 

With that said! If you have been invites to our wedding and have any questions please do not hesitate to contact Puma or I. We would love to hear your excitement, plans, questions, etc.  

For a while now I thought no one had been interested outside of the wedding party. Discovered it's because no one is coming to me, but I hear about them going to her in a much delayed informing due to a slip in conversation. 

One of those happened again last night. And yes, I had a good cry before bed. But I had a Puma praying for me. Because he is a wonderful man and such a blessing. I couldn't have asked for a better partner than him. 

Victor! Puma! I love you so very much and cannot wait to have the honor and privilege of being your wife! <3

~Lion


Tuesday, August 13, 2013

Less than two months!

Been praying a lot, Puma and I. Unfortunately I am not skilled or trained well enough anymore to keep my emotions in check. That is why God has blessed me with such an amazing husband-to-be. He listens to my venting, holds me when I need it, and once I'm done he offers reason. We pray to God, discuss with each other how each situation needs to be handled, then support and praise. It's hard. 

With that said: Oh. My. Gravy! Two months until I get to marry this amazing man. This blessing that has turned in to my best friend. Just. Wow. 

Gears are being made in batches. They are turning out wonderfully. 

I finally worked out that part of my depression was still trying to cling to a small wedding. Even to the point of excluding my family. This has been remedied. My amazing sister in law is now a bridesmaid, and my brother a groomsman. My other brother will be escorting one of Puma's grandmothers. And we found a solution to my lack of grandparents creating an empty row: the amazing H family! Their trio of amazing daughters are our banner bearer, ringholder, and flower girl. That's right, a girl is being the ring holder, booyah. 

We have accomplished a ton. But we still have a ton to do. 

Sunday, July 21, 2013

Climbing out of the valley

So as of my last post, I was feeling pretty crummy. My amazing Puma has been so supportive: prayer, encouragement, listening ear and willing shoulder to cry on, constant support, even silence when necessary and harsh truth when called for. I honestly don't know what I did to deserve such an amazing man.

Updates!

The Tiger roommate and I created my bodyform the other week. Oh. My. Gravy. That was hilarious. One old shirt, two rolls of duct tape, and a wire hanger later. She rocks.

Mock vest is done and adjusted to fit Puma perfectly. The final vest has been cut and is being pieces together. I am so flipping excited, the colors are amazing.

Trying to get meeting dates scheduled with the coordinator.

Decision made about apartment and paperwork started.

Bridal shower went off smoothly. I'll get more in to that later.

Thanks for checking in.

~Lion

Tuesday, June 25, 2013

And the depression kicks in

So, just over three months out and the depression kicks in. We finished all the invitations and dropped them off at the Post Office Sunday night. I totally did not consider that the invitation was too large or was over an ounce. The lot got sent back, some of them with postage due stamps. That was the straw that broke my back.

I had already been battling feeling down from the time we started our guest list. My idea of the perfect wedding? Only close friends and family that we see and encounter in our daily lives. Well, that didn't last long. The list doubled in size as we added on people who we were asked to. Extended family, people I have never heard of before, once-was-friends and aquaintances who heard it through the grapevine and informed us how much they were looking forward to invitations... I fight crying over that fact every few days. I try to let it go and be reassured that even though I will be uncomfortable, my guests will be having a blast playing catch-up and hitting on their barly-known dates. Some days I want to say forget it all and do one of two things- give the ring back (that only lasts for a second) or elope. Unfortunately both of those options are out. My mother would never forgive me and neither will my future MIL.

Then the bridal party. Sigh. We tried to be lax in dress code, giving a fee rules and lettinf them find what was comfortable. Now it's just getting costumey with one of the maids wanting fairesque makeup. I'm doing my best to be polite and diplomatic, but inside I am screaming. To top that off? One of the maids was selected basically for family politic reasons.

Also, we are three months out and I still havent gotten any solid answers from the church other than the date being confirmed.

And then! I keep getting the push from other people on how I should be doing things. How to decorate, what to do with the cake, etc.

But yeah, the envelopes today and as I was trying to ask for clarification but was repeatedly being talked over finally broke me. Today was supposed to be a day off of work loaded with fun DIY projects. I'm curled up in bed having a pity party instead. Anybody needs me just look for the buried, sobbing mess clutching her stuffed lion.

~Lion

Sunday, June 2, 2013

Invitations!

So, today was a really good day.

This morning Puma and I worked tech for the church service. We personally love it.  It will be the last time we will get to work on the team together at the same time. At the end of the month, Puma will be stepping down from his paid position as Video and Audio tech for the church.  I am just a volunteer.  We may work together again as volunteers, but the likely-hood is less now.

After church was noms, and working on the documents for our invitations.  Then...to the print shop!

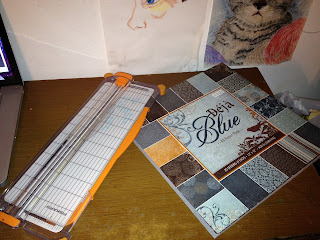
It took an hour or two to have all the pages printed up, and then using their paper cutters (which were so amazing) to trim everything down.  Everything nice and smooth, even, no fluffies or areas to sand.

Combined it was 20 pages color printed for the maps with three on each page, 30 for the invite with two on each page, reply cards were four a page for a total of 15 pages (and the machine was being weird, we had to get an employee...more on that later), and then 8 pages for the SteamPunk description, with eight on each page.  A total of 73 pages printed on cardstock. We bought a package of cardstock from Wal-Mart for about six bucks, and the printing color and black & white took $17.10.  With all the other bits and pieces to put on (scrapbook paper, gears and buttons, ribbons, stamps) we're looking at spending no more than $100 on the invitations. That's below budget!

Now before you go all bug-eyed, let me say we are creating 60 invites, and in the cost I am including postage for sending them out -and- prestamping the envelops for the reply cards. Double postage. So...we're doing pretty awesome.

Leave us some comments and words of encouragement. The more we know people are reading, the more we shall post.  With pictures even.

~Lion

Tuesday, April 16, 2013

Hiatus Update

So, for anyone who may be checking in here (if there is anyone), you have noticed we have not updated in two months.  We apologize for that.  The Lion maintains the blog, and work had gotten crazy. And now currently Lion is without a job, so prep and job hunting  are my current goals since I no longer have to prep for a classroom.

We have completed the garters, the teal flowers, and our SendOffs.  So cute! And the molds came in for the gears, etc. So excited!

Thursday, February 14, 2013

I love Etsy

Another thing we are doing ourselves is the cake.  Well, cupcakes. One thing we agreed on was we wanted details on the cupcakes. Gears, pearls, antique buttons, clock work, dragonflies, etc. Not exactly the type of thing one can free form. 

Behold, Etsy.

I searched and searched, unhappy with the selection, until I came across MoldMuse. Beautiful detail. Just the right size for chocolate molds. I just ordered eight different food safe molds, just under $50.

Okay, say it with me now: YAIY!

But seriously, check out this beautiful gear. Is it not gorgeous? 

I cannot wait until these molds come in. Look forward to a new post when they do ^_^

Saturday, February 9, 2013

Weekend Work

We are now in our longest and biggest project: the satin and chiffon flowers. The lighter teal blue is all cut and singed, now just forming the flowers. While I am forming the flowers, my Puma is working on sizing, cutting, and burning the edges of the dark blue fabric.  We also have ivory and a champagne blush to go. Look forward to so pic heavy posts coming up of these. I am very proud of the flowers. They are so pretty!

Friday, February 8, 2013

Tuesday, January 29, 2013

SteamPunk Inspired Boutonnieres- Tutorial


Welcome to the second post covering the boutonnieres. In this entry we are going to cover how we completed our DIY gems here.

This was the general loose idea for the boutonnieres. Nothing was set yet, no glue used. In the bottom right corner you can see the sketched ideas and notes we were totally not passing during church. Nope. Nuh-uh. Totally not. *shifty eyes*
But let's break it down.


All of the items were purchased from the Crafting Store Trio: JoAnn's, Michael's, and Hobby Lobby.  The feathers I had purchased pre-bound.  Buttons have been sitting in my box forever, gears, fabric circles to fold in to flowers, and pins. I got really lost in my own mind while making these, and forgot to take pictures at each stage.


Before doing anything else, I went ahead and folded one of the circles to resemble a flower. Not an exact replica, but pretty none-the-less. After pinching the bottom corner, I took needle with thread in a matching color and did several quick-stitches back and forth. Once these were done, the Puma and I were able to lay and design the boutonnieres around it.

Using E6000 glue, I layered a set of gears on top of each other to give it more depth and held it in place with alligator clips. Once that was set we placed to other large gear on top of the feathers, and used E6000 again. We used the hot glue to fuse the flower to the feathers at the binding already there. Once everything was settled and solid, I placed the layered gears on top of the flower and used E6000 again. After that was settled, we unwound a length of the leather cording and added a facetted bead in the corresponding darker blue color. Then began the wrapping and hot glue process. Two layers were put on, with the bead slid in with three more wrap around to go so it would also be secure but not stuck.  Once everything was dried and cooled, flipped it over and added a pin with E6000 glue, holding it in place with alligator clips. The items were left to dry over-night.


And here are the finished products! The pictures on top are of the Puma's special boutonniere. The picture on the bottom are for his groomsmen. Instead of the detailed gear, they got a brassy button.

Total work time? Maybe an hour or two. With all the drying time? A day and a half. But totally worth it. We have customized boutonnieres that my Puma and I have designed. We love them!

Hopefully this may help someone else. Enjoy, thanks for reading, please leave a comment and have a blessed day!


SteamPunk Inspired Boutonnieres - Cost Breakdown

What can I say? We love SteamPunk.  Even the mislabeled stuffs can be amusing.  To keep cost down, we are not going all out SteamPunking everything. Instead, using little hints here and there. With that said, let's continue.

Supplies
feathers- $3 from Hobby Lobby, used a 40% coupon making them $1.80, so 60 cents a piece
gears A- $3 from Hobby Lobby, bought on 50% off so $1.50, which is 13 cents each already owned
gears B- $5 from Hobby Lobby, used a 40% coupon making it $3, each gear being 25 cents already owned
gears C- $4 from Michaels, $1.25 each. No sale
cloth- Same from the bouquet
pin- $2 from Hobby Lobby, bought 50% off, $1 making them 2 cents each
buttons- mixed grab bags, lefts overs, scrapbooking already owned
waxed leather cording- $4 from Hobby Lobby, no discount
hot glue gun already owned
hot glue sticks already owned
E6000 glue already owned
beads- $2 from HobbyLobby, bought 50% off so $1 which makes each bead 8 cents

Total cost out of pocket: $16
Broken down cost per boutonniere: $2.41
Custom boutonnieres priced by local florists ranged anywhere from $10-$45 each.

The leftover items will be used elsewhere. Please check back for the tutorial later.

Friday, January 25, 2013

Downside of doing what I love...

...is that germs are easily spread. It's all part of being a teacher. Two weeks, and finally feel like I am on a solid path to being well again. Flu season hit hard. Although I have not caught said virus (thank you, God) I did get the cold. And since I am stubborn (just ask my puma), I medicated with ibuprofen and DayQuil and kept trucking. Fever kicked my backside the Wednesday and I literally just came home, medicated, ate, and placed water by my bed before sleeping nearly a solid twelve hours.

Bleh.

But now I am getting better, and so glad tomorrow is Saturday. There are a few errands on the agenda, but so are naps and fluids. We have a few completed projects that I need to edit. Hopefully we will have another entry up and ready soon. Thank you for your patience.

~Lion

Sunday, January 13, 2013

Sunday Night Tasks

So, we are having a blast watching Dr. Who and working on wedding projects.  Puma is working on the Save the Dates, and I...am undecided.  I can either work on the fabric flowers or the paper flowers. Either way.....flowers!

~Lion

Will You Be My Bridesmaid?

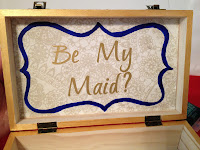
So, now that I have asked my girls to be my maids (and they accepted, woot!) I can post this craft.

On Pinterest I found a link to a site called Wedding Chicks where these nifty little boxes were found. Here is their link for the Be My Maid boxes. They have a tutorial already, but I changed mine a little and will still share.


Needed supplies:
Wooden Boxes (mache works, too)
Papercrafting glue
Paint
Paintbrush
Oil
Scrapbooking paper
Scrapbooking stickers
Scissors (regular and scrapbooking)


So I wiped my boxes clean before starting.  The boxes I picked up from Hobby Lobby on two different trips using the 40% off coupon from the app on my phone.

 I measure the inside of flat of the boxes and cut out two rectangles of that size from the same paper.  I customized the boxes for each maid: one was pretty and lacy, the other cool typewriter keys. I used Martha Stewart crafting glue to coat the wrong side of each paper and lay it in the box, rubbing to make a strong seal. Usually I am not a fan of Martha Stewart, but this glue was amazing. No bubbling or weird shapes showing up while drying.  

While the Glue was drying, I went around the edges with gold paint. It took two layers before it showed up really well.


Now, I changed the way I was going to do the brackets. Instead of painting the entire area around the brackets, I just left the bracket line. Two coats of acrylic paint. It had to be left a while to dry because the paint became really thick in some places.

Later on I discovered the gold paint was sticking to itself when closed. I took some peppermint oil and rubbed the lining. It's been two weeks and hasn't stuck since then.

 
Next I was going to paint the words and decided against it. My OCD was having a riot. Instead I used scrapbooking stickers. One pack had more than enough for both boxes.

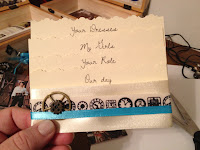
Now to move on to the contents. Inside I typed, sized, and layered four cards of information: Our Day, Your Role, My Girls, Your Dresses. Each card contained the information for each subject. To give it a decorative top we used scrapbooking scissors.


Now we had to have a binding of appropriate design. Found adorable, decorated ribbon in the scrapbooking section of Hobby Lobby. One with gears, one with keys, and the third with clocks. Used the keys and clocks for my two ladies. On top of that I layered and thinner ribbon in one of our selected blue colors. Under both of those I used a wide, cream ribbon as a base. I used hot glue to attach them to each other on the back side.  Then selected two gears to layer, glued them to each other, then attached them to the ribbon.


Now for the rest. I took paint samples in the themes and colors we are going for, cut them down to a size that would fit in the box, glued them in to new strips, and held them together with small, brass paperclips.

Also we picked out some inspiration pictures to help get their creative minds working.  Different ideas and examples of steam punk, and held them together with a hanger shaped paper clip.


Combine it all together and added some personalized treats.  For the Dragon she got a packet of flavored Via and Godiva chocolate(milk chocolate with caramel).  For the Tiger, she also got Godiva (dark chocolate with sea salt) and was taken out to dinner. Here is the Dragon's box. I still need to upload the Tiger's box.


I hope you enjoyed and that this helped.  Please leave a comment telling us what you think or if you are going to try it on your own. Thanks!

~Lion


Tuesday, January 8, 2013

Can of Dates - Tutorial


Welcome to part two of the Can of Dates!  Let's jump right in.  

1) First I collected a large metal can from work. 6lb and 9oz container. Yaiy for my job! ^_^  Strip the can and scrub it down inside and out. You really don't want anything left over in it when you start to work. Ew. Let dry completely before moving on to the next step.


2) This step is optional. Personally I wanted to give the paper a better base to adhere to and color wash the inside so it wasn't so screamingly low budget.  Take can to a well ventilated area and use newspaper or a drop-cloth of some sort to protect the area you will be spraying on. Dollar store table covers work great for this. Spray.  Don't feel like you have to completely cover it in one go. It took me three rounds.  If you try to get it in one round, be warned: it will build up, bubble, and run.  Not the best look.  Let completely dry.


3) Now, while your can is drying, let's cut the paper.  I selected three 12inx12in scrapbook papers, two in the same design and one in a different.  Each was cut in half to form two rectangles of the same size, 6inx12in. Set these aside to use on the can later.


 4) Take the rest of your scrapbooking paper and begin to cut it in to 3inx4in rectangles.  I used my paper cutter and sliced 3in wide sections, then stacked them four together and sliced them again at the 4in mark. You should have a pile of lots of pretty papers!

5) Fold all those pretty papers in half so they become 3inx2in cards.  Now this is where I messed up a batch of twenty cards.  I had thought they would be too flimsy just being scrapbook paper and was going to add a lining of cardstock.  Don't do it, they look much better without it.

6) Get that glue gun heating up! Those rectangles we set aside earlier, pull them back out. The four matching rectangles you will glue to the can. Do it in small sections, laying down an inch or two of glue at a time. Remember, this glue hardens quickly. Yes, they will overlap. Just make sure to plan your laying so they all overlap in the same spot and can easily be hidden by whichever way you decide to turn the can.  Take the last two rectangles and make a runner around the middle of the can with them.  Congrats, you have finished covering your can!

7) Now I took a scrap piece of cream cardstock, scrapbooking scissors, and a scrapbook pen to make the Can of Dates label.  Write on your label before you glue it! Adhere the label with another round of hot glue.

8) Throw your cards in to the can for storage until ready to use!


 Tada! Our alternative to the classic guest book. Psst, my Puma picked out the colors.  I'm glad, because if he didn't I'd still be stuck at the store trying to decide ^_^

Hope this helps! Leave a comment below. Like it, hate it, want to try it, whichever! Good luck and thank you for reading.

~Lion

Can of Dates- Cost Breakdown

The Puma and I pondered for a while on what was the purpose of a guestbook. Woohoo, a big book where people sign their name and give you well wishes and/or marriage advice.

....

Seriously? What kind of fun is that? We would look through it maybe once. Maybe. Then is should sit on one of the many bookcases, collect dust, and never be opened again. Or perhaps stored away to never be seen again until we move.

We looked at alternates. Thumbprints, polaroids, even a Fill in the Calendar with birthdates.  None of them seemed like "us."  Then came Pinterest to the rescue. Came across this pin called Can of Dates. The idea is that each guest fills in a card with a date idea and signs their name. Puma and I will have a set date night for each week, and we will pull a card from the can to use.  This way we wont be stuck in a rut, and we can have a blast doing the selected date and being amused by the friend who wrote it.  Sure, some people may have more than one idea. We made extra cards :D

Supplies
large tin can free from work
spray paint already had from previous project
scrapbook paper $5 from Hobby Lobby, multiple single sheets on 50% sale
cardstock already owned
pen already owned
hot glue gun already owned
hot glue sticks already owned
paper cutter already owned- I am a Preschool Teacher

Total cost? Five bucks and about an hour of my time.

Look for Part Two which will contain the tutorial on how to complete this project.