Tuesday, January 29, 2013

SteamPunk Inspired Boutonnieres- Tutorial


Welcome to the second post covering the boutonnieres. In this entry we are going to cover how we completed our DIY gems here.

This was the general loose idea for the boutonnieres. Nothing was set yet, no glue used. In the bottom right corner you can see the sketched ideas and notes we were totally not passing during church. Nope. Nuh-uh. Totally not. *shifty eyes*
But let's break it down.


All of the items were purchased from the Crafting Store Trio: JoAnn's, Michael's, and Hobby Lobby.  The feathers I had purchased pre-bound.  Buttons have been sitting in my box forever, gears, fabric circles to fold in to flowers, and pins. I got really lost in my own mind while making these, and forgot to take pictures at each stage.


Before doing anything else, I went ahead and folded one of the circles to resemble a flower. Not an exact replica, but pretty none-the-less. After pinching the bottom corner, I took needle with thread in a matching color and did several quick-stitches back and forth. Once these were done, the Puma and I were able to lay and design the boutonnieres around it.

Using E6000 glue, I layered a set of gears on top of each other to give it more depth and held it in place with alligator clips. Once that was set we placed to other large gear on top of the feathers, and used E6000 again. We used the hot glue to fuse the flower to the feathers at the binding already there. Once everything was settled and solid, I placed the layered gears on top of the flower and used E6000 again. After that was settled, we unwound a length of the leather cording and added a facetted bead in the corresponding darker blue color. Then began the wrapping and hot glue process. Two layers were put on, with the bead slid in with three more wrap around to go so it would also be secure but not stuck.  Once everything was dried and cooled, flipped it over and added a pin with E6000 glue, holding it in place with alligator clips. The items were left to dry over-night.


And here are the finished products! The pictures on top are of the Puma's special boutonniere. The picture on the bottom are for his groomsmen. Instead of the detailed gear, they got a brassy button.

Total work time? Maybe an hour or two. With all the drying time? A day and a half. But totally worth it. We have customized boutonnieres that my Puma and I have designed. We love them!

Hopefully this may help someone else. Enjoy, thanks for reading, please leave a comment and have a blessed day!


SteamPunk Inspired Boutonnieres - Cost Breakdown

What can I say? We love SteamPunk.  Even the mislabeled stuffs can be amusing.  To keep cost down, we are not going all out SteamPunking everything. Instead, using little hints here and there. With that said, let's continue.

Supplies
feathers- $3 from Hobby Lobby, used a 40% coupon making them $1.80, so 60 cents a piece
gears A- $3 from Hobby Lobby, bought on 50% off so $1.50, which is 13 cents each already owned
gears B- $5 from Hobby Lobby, used a 40% coupon making it $3, each gear being 25 cents already owned
gears C- $4 from Michaels, $1.25 each. No sale
cloth- Same from the bouquet
pin- $2 from Hobby Lobby, bought 50% off, $1 making them 2 cents each
buttons- mixed grab bags, lefts overs, scrapbooking already owned
waxed leather cording- $4 from Hobby Lobby, no discount
hot glue gun already owned
hot glue sticks already owned
E6000 glue already owned
beads- $2 from HobbyLobby, bought 50% off so $1 which makes each bead 8 cents

Total cost out of pocket: $16
Broken down cost per boutonniere: $2.41
Custom boutonnieres priced by local florists ranged anywhere from $10-$45 each.

The leftover items will be used elsewhere. Please check back for the tutorial later.

Friday, January 25, 2013

Downside of doing what I love...

...is that germs are easily spread. It's all part of being a teacher. Two weeks, and finally feel like I am on a solid path to being well again. Flu season hit hard. Although I have not caught said virus (thank you, God) I did get the cold. And since I am stubborn (just ask my puma), I medicated with ibuprofen and DayQuil and kept trucking. Fever kicked my backside the Wednesday and I literally just came home, medicated, ate, and placed water by my bed before sleeping nearly a solid twelve hours.

Bleh.

But now I am getting better, and so glad tomorrow is Saturday. There are a few errands on the agenda, but so are naps and fluids. We have a few completed projects that I need to edit. Hopefully we will have another entry up and ready soon. Thank you for your patience.

~Lion

Sunday, January 13, 2013

Sunday Night Tasks

So, we are having a blast watching Dr. Who and working on wedding projects.  Puma is working on the Save the Dates, and I...am undecided.  I can either work on the fabric flowers or the paper flowers. Either way.....flowers!

~Lion

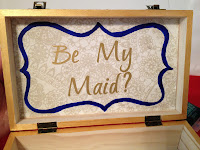
Will You Be My Bridesmaid?

So, now that I have asked my girls to be my maids (and they accepted, woot!) I can post this craft.

On Pinterest I found a link to a site called Wedding Chicks where these nifty little boxes were found. Here is their link for the Be My Maid boxes. They have a tutorial already, but I changed mine a little and will still share.


Needed supplies:
Wooden Boxes (mache works, too)
Papercrafting glue
Paint
Paintbrush
Oil
Scrapbooking paper
Scrapbooking stickers
Scissors (regular and scrapbooking)


So I wiped my boxes clean before starting.  The boxes I picked up from Hobby Lobby on two different trips using the 40% off coupon from the app on my phone.

 I measure the inside of flat of the boxes and cut out two rectangles of that size from the same paper.  I customized the boxes for each maid: one was pretty and lacy, the other cool typewriter keys. I used Martha Stewart crafting glue to coat the wrong side of each paper and lay it in the box, rubbing to make a strong seal. Usually I am not a fan of Martha Stewart, but this glue was amazing. No bubbling or weird shapes showing up while drying.  

While the Glue was drying, I went around the edges with gold paint. It took two layers before it showed up really well.


Now, I changed the way I was going to do the brackets. Instead of painting the entire area around the brackets, I just left the bracket line. Two coats of acrylic paint. It had to be left a while to dry because the paint became really thick in some places.

Later on I discovered the gold paint was sticking to itself when closed. I took some peppermint oil and rubbed the lining. It's been two weeks and hasn't stuck since then.

 
Next I was going to paint the words and decided against it. My OCD was having a riot. Instead I used scrapbooking stickers. One pack had more than enough for both boxes.

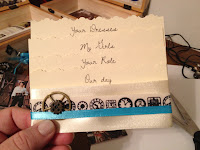
Now to move on to the contents. Inside I typed, sized, and layered four cards of information: Our Day, Your Role, My Girls, Your Dresses. Each card contained the information for each subject. To give it a decorative top we used scrapbooking scissors.


Now we had to have a binding of appropriate design. Found adorable, decorated ribbon in the scrapbooking section of Hobby Lobby. One with gears, one with keys, and the third with clocks. Used the keys and clocks for my two ladies. On top of that I layered and thinner ribbon in one of our selected blue colors. Under both of those I used a wide, cream ribbon as a base. I used hot glue to attach them to each other on the back side.  Then selected two gears to layer, glued them to each other, then attached them to the ribbon.


Now for the rest. I took paint samples in the themes and colors we are going for, cut them down to a size that would fit in the box, glued them in to new strips, and held them together with small, brass paperclips.

Also we picked out some inspiration pictures to help get their creative minds working.  Different ideas and examples of steam punk, and held them together with a hanger shaped paper clip.


Combine it all together and added some personalized treats.  For the Dragon she got a packet of flavored Via and Godiva chocolate(milk chocolate with caramel).  For the Tiger, she also got Godiva (dark chocolate with sea salt) and was taken out to dinner. Here is the Dragon's box. I still need to upload the Tiger's box.


I hope you enjoyed and that this helped.  Please leave a comment telling us what you think or if you are going to try it on your own. Thanks!

~Lion


Tuesday, January 8, 2013

Can of Dates - Tutorial


Welcome to part two of the Can of Dates!  Let's jump right in.  

1) First I collected a large metal can from work. 6lb and 9oz container. Yaiy for my job! ^_^  Strip the can and scrub it down inside and out. You really don't want anything left over in it when you start to work. Ew. Let dry completely before moving on to the next step.


2) This step is optional. Personally I wanted to give the paper a better base to adhere to and color wash the inside so it wasn't so screamingly low budget.  Take can to a well ventilated area and use newspaper or a drop-cloth of some sort to protect the area you will be spraying on. Dollar store table covers work great for this. Spray.  Don't feel like you have to completely cover it in one go. It took me three rounds.  If you try to get it in one round, be warned: it will build up, bubble, and run.  Not the best look.  Let completely dry.


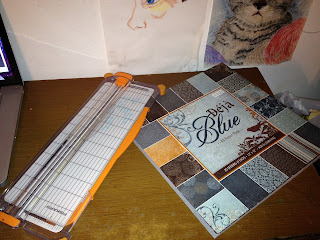
3) Now, while your can is drying, let's cut the paper.  I selected three 12inx12in scrapbook papers, two in the same design and one in a different.  Each was cut in half to form two rectangles of the same size, 6inx12in. Set these aside to use on the can later.


 4) Take the rest of your scrapbooking paper and begin to cut it in to 3inx4in rectangles.  I used my paper cutter and sliced 3in wide sections, then stacked them four together and sliced them again at the 4in mark. You should have a pile of lots of pretty papers!

5) Fold all those pretty papers in half so they become 3inx2in cards.  Now this is where I messed up a batch of twenty cards.  I had thought they would be too flimsy just being scrapbook paper and was going to add a lining of cardstock.  Don't do it, they look much better without it.

6) Get that glue gun heating up! Those rectangles we set aside earlier, pull them back out. The four matching rectangles you will glue to the can. Do it in small sections, laying down an inch or two of glue at a time. Remember, this glue hardens quickly. Yes, they will overlap. Just make sure to plan your laying so they all overlap in the same spot and can easily be hidden by whichever way you decide to turn the can.  Take the last two rectangles and make a runner around the middle of the can with them.  Congrats, you have finished covering your can!

7) Now I took a scrap piece of cream cardstock, scrapbooking scissors, and a scrapbook pen to make the Can of Dates label.  Write on your label before you glue it! Adhere the label with another round of hot glue.

8) Throw your cards in to the can for storage until ready to use!


 Tada! Our alternative to the classic guest book. Psst, my Puma picked out the colors.  I'm glad, because if he didn't I'd still be stuck at the store trying to decide ^_^

Hope this helps! Leave a comment below. Like it, hate it, want to try it, whichever! Good luck and thank you for reading.

~Lion

Can of Dates- Cost Breakdown

The Puma and I pondered for a while on what was the purpose of a guestbook. Woohoo, a big book where people sign their name and give you well wishes and/or marriage advice.

....

Seriously? What kind of fun is that? We would look through it maybe once. Maybe. Then is should sit on one of the many bookcases, collect dust, and never be opened again. Or perhaps stored away to never be seen again until we move.

We looked at alternates. Thumbprints, polaroids, even a Fill in the Calendar with birthdates.  None of them seemed like "us."  Then came Pinterest to the rescue. Came across this pin called Can of Dates. The idea is that each guest fills in a card with a date idea and signs their name. Puma and I will have a set date night for each week, and we will pull a card from the can to use.  This way we wont be stuck in a rut, and we can have a blast doing the selected date and being amused by the friend who wrote it.  Sure, some people may have more than one idea. We made extra cards :D

Supplies
large tin can free from work
spray paint already had from previous project
scrapbook paper $5 from Hobby Lobby, multiple single sheets on 50% sale
cardstock already owned
pen already owned
hot glue gun already owned
hot glue sticks already owned
paper cutter already owned- I am a Preschool Teacher

Total cost? Five bucks and about an hour of my time.

Look for Part Two which will contain the tutorial on how to complete this project.